Introduction
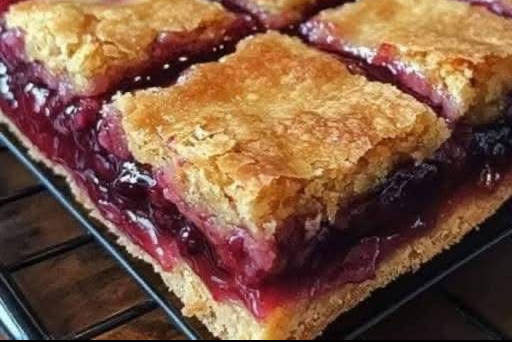
Forget the fuss and embrace the fun with these incredible Cherry Pie Bars! Imagine all the sweet, tangy goodness of a classic cherry pie, but in a convenient, portable, and utterly delicious bar form. These delightful treats offer the perfect balance of a flaky, buttery crust and a luscious, fruit-filled center, making them an ideal dessert for any occasion. Whether you’re a seasoned baker or just starting out, you’ll find these bars surprisingly easy to make and even easier to devour.
What makes Cherry Pie Bars truly special is their versatility and ease of serving. Unlike a traditional pie that requires careful slicing and plating, these bars are designed to be cut into neat squares, perfect for grabbing and going. They’re a guaranteed crowd-pleaser at potlucks, picnics, family gatherings, or even as a simple, satisfying dessert after a weeknight meal. The vibrant red cherry filling, encased in a golden-brown crust, is not only a feast for the taste buds but also a beautiful sight, making them an instant hit on any dessert table.
Our Cherry Pie Bars recipe simplifies the pie-making process without sacrificing any of the beloved flavors. We’ll guide you through creating a sturdy yet tender crust that perfectly complements the rich, slightly tart cherry filling. You’ll learn how to achieve that irresistible balance of textures and tastes, ensuring every bite is pure bliss. Get ready to bake up a batch of these irresistible bars that will have everyone asking for the recipe!
Nutritional Information
Per serving (approximate values):
- Calories: 320
- Protein: 4g
- Carbohydrates: 48g
- Fat: 14g
- Fiber: 2g
- Sodium: 180mg
Ingredients
For the Crust:
- 2 ½ cups all-purpose flour
- 1 cup (2 sticks) unsalted butter, very cold and cut into small cubes
- ½ cup granulated sugar
- 1 teaspoon salt
- ¼ cup ice water (or more, as needed)
For the Cherry Filling:
- 4 cups fresh or frozen pitted cherries (if using frozen, do not thaw)
- ¾ cup granulated sugar (adjust to your sweetness preference and cherry tartness)
- ¼ cup cornstarch
- 1 tablespoon lemon juice (freshly squeezed is best)
- ½ teaspoon almond extract (optional, but highly recommended)
- 2 tablespoons unsalted butter, cut into small pieces
For the Topping (Crumb Topping or Lattice Strips):
- If making a full top crust or lattice: Use half of the prepared crust dough.
- If making a crumb topping:
- 1 cup all-purpose flour
- ½ cup granulated sugar
- ½ cup (1 stick) unsalted butter, melted
- ½ teaspoon cinnamon (optional)
For Egg Wash (optional, for golden top crust):
- 1 large egg, beaten with 1 tablespoon water or milk
Instructions
- Prepare the Crust: In a large bowl, whisk together the flour, sugar, and salt. Add the cold, cubed butter. Using a pastry blender, your fingertips, or a food processor, cut the butter into the flour mixture until it resembles coarse crumbs with some pea-sized pieces of butter remaining.
- Gradually add the ice water, one tablespoon at a time, mixing until the dough just comes together. Be careful not to overmix. The dough should be shaggy but hold together when squeezed.
- Divide the dough in half. Form each half into a flat disc, wrap tightly in plastic wrap, and refrigerate for at least 30 minutes (or up to 2 days). Chilling the dough is crucial for a flaky crust.
- Preheat Oven and Prepare Pan: Preheat your oven to 375°F (190°C). Lightly grease and flour a 9×13-inch baking pan, or line it with parchment paper, leaving an overhang on the sides for easy removal.
- Roll Out Bottom Crust: On a lightly floured surface, roll out one disc of chilled dough into a 9×13-inch rectangle, roughly ¼-inch thick. Carefully transfer the dough to the prepared baking pan, pressing it evenly into the bottom and slightly up the sides. If the dough tears, simply press it back together.
- Blind Bake (Optional, for extra crispness): To prevent a soggy bottom crust, you can blind bake it. Prick the bottom of the crust all over with a fork. Line the crust with parchment paper and fill with pie weights or dried beans. Bake for 10-15 minutes, or until the edges are lightly golden. Remove the weights and parchment, then continue to bake for another 5 minutes. Let cool slightly.
- Prepare the Cherry Filling: In a medium saucepan, combine the pitted cherries, granulated sugar, lemon juice, and cornstarch. If using fresh cherries, you may add 1-2 tablespoons of water to help them release their juices. Cook over medium heat, stirring constantly, until the mixture thickens and comes to a gentle boil. The cherries should soften, and the sauce should become glossy. This usually takes about 5-8 minutes.
- Remove from heat and stir in the almond extract (if using) and the 2 tablespoons of butter until melted and well combined. Let the filling cool slightly while you prepare the top layer.
- Assemble the Bars: Pour the cooled cherry filling evenly over the prepared bottom crust in the baking pan.
- Prepare the Top Layer:
- For a Solid Top Crust or Lattice: Roll out the second disc of chilled dough into a 9×13-inch rectangle. You can either place it directly over the filling, or cut it into strips to create a lattice pattern. If using a full top crust, cut a few slits in the top for steam to escape.
- For a Crumb Topping: In a medium bowl, combine the flour, sugar, and cinnamon (if using). Pour in the melted butter and mix with a fork until moist crumbs form. Sprinkle this mixture evenly over the cherry filling.
- Bake: If using a full top crust, you can brush it with an egg wash for a golden sheen. Place the baking pan on a baking sheet to catch any potential drips. Bake for 40-50 minutes, or until the crust is golden brown and the filling is bubbly. If the crust starts to brown too quickly, you can loosely tent it with aluminum foil.
- Cool Completely: This is the most crucial step for neat bars! Remove the pan from the oven and place it on a wire rack to cool completely. This can take 2-3 hours, or even longer. The filling needs ample time to set properly.
- Cut and Serve: Once fully cooled, use the parchment paper overhang to lift the bars out of the pan. Place them on a cutting board and cut into squares or rectangles using a sharp knife. Wipe the knife clean between cuts for the neatest edges. Serve and enjoy!
Cooking Tips and Variations
To ensure your Cherry Pie Bars are nothing short of perfect, here are some invaluable tips and exciting variations to try:
Prevent a Soggy Crust: A common pitfall with fruit bars is a soggy bottom crust. To combat this, first and foremost, ensure your butter and water for the crust are ice cold. This creates steam during baking, leading to a flakier texture. Additionally, blind-baking the bottom crust as described in the instructions is highly recommended. Prick the crust with a fork, line with parchment paper, fill with pie weights, and bake for 10-15 minutes before adding the filling. This pre-baking step helps create a barrier against the moisture from the fruit. Another trick is to sprinkle a thin layer of fine breadcrumbs or crushed cornflakes over the bottom crust before adding the filling; these absorb excess moisture.